
How to Record Audio With Useful Metadata
 By HenrikUpdated Aug 16, 20266 min read
Record audio and keep the file useful afterward by checking title, artist, cover art, lyrics, filename patterns, and export format.

A recording is not finished just because sound reached a file. If the title is missing, the artist is wrong, the cover art belongs to another release, or the filename is track01.mp3, the file will be hard to find later.
This guide explains how to record audio with metadata in mind: capture cleanly first, verify the audio, then check the information that turns a file into a usable library item.
The Short Answer
Start with this order:
- Record a short sample from the source.
- Confirm the audio itself is correct.
- Check title, artist, album, cover art, and lyrics where available.
- Use a filename pattern that stays useful outside the recorder.
- Manually edit or re-identify when the automatic match is wrong.
- Save a practical format for your use case.
Automatic metadata is helpful, but it is not proof. Treat it as a starting point that still needs review.
What Counts as Useful Metadata?
For music, check:
- Title
- Artist
- Album
- Track number, if you need album order
- Cover art
- Lyrics, if available and useful
- Filename
- Output format
For spoken audio, radio, webinars, or lessons, useful metadata is often simpler:
- Speaker or show name
- Topic
- Date
- Source or station name
- Clear filename
Do not force song-style metadata onto spoken recordings. A file named 2026-07-28 - Webinar - Audio Routing Basics.mp3 may be more useful than guessed artist and album fields.
Record First, Then Verify
The audio itself comes first. Before fixing tags:
- Play the file from the beginning.
- Jump to the middle.
- Check the ending.
- Listen for silence, wrong audio, notification sounds, or accidental fragments.
- Confirm the source is the one you intended to record.
If the recording is silent or wrong, fix capture before metadata. The first-recording troubleshooting checklist is the fastest route.
Use Cinch for Music Metadata
Cinch Audio Recorder is strongest when the source is music. It can help record playback and then organize the Library with song information where available.
Use it this way:
- Open Cinch Audio Recorder.
- Start recording from your browser, music app, radio site, or desktop playback source.
- Stop after a short test and open the Library.
- Play the saved item.
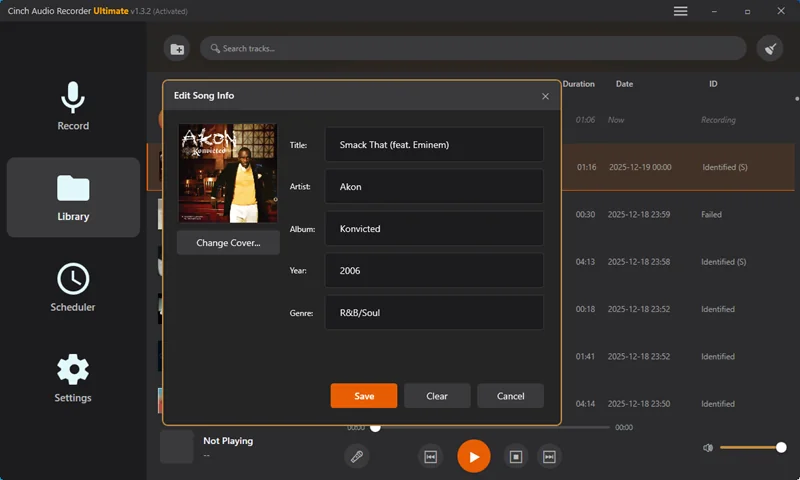
- Check title, artist, cover art, lyrics, and filename.
- Use manual edit or re-identification if something looks wrong.
- Record the full session only after the test behaves correctly.
This is where a dedicated recorder differs from a raw waveform editor. It does not just hand you audio; it gives you a place to review, name, identify, and export the file.
When Automatic Metadata Goes Wrong
Automatic matching can fail for understandable reasons:
| Symptom | Likely Cause | What To Do |
|---|---|---|
| No title or artist | Not enough recognizable audio, noisy source, or obscure track | Try a cleaner sample or edit manually |
| Wrong cover art | Similar title, remix, live version, or wrong release | Replace artwork manually |
| One long file | Recorder captured the whole session without track handling | Split first, then tag each useful segment |
| Tiny fragments | Ads, gaps, notifications, or short clips | Delete, merge, or adjust short-clip settings |
| Metadata looks right but audio is wrong | The file captured the wrong source | Re-record; do not tag the wrong file |
The safest rule is simple: listen first, then trust the tag.
If the audio is correct but the artwork is missing or wrong, use the add cover art to audio guide before saving a final library copy.
Filename Patterns That Work
For music:
Artist - Title.ext
Artist\Album\01 - Title.ext
For radio or spoken audio:
2026-07-28 - Station Name - Show Segment.mp3
2026-07-28 - Course Name - Lesson 03.m4a
Good filenames make files portable. They still make sense if you move them to a USB drive, phone, car stereo, or another media player that ignores some tags.
If you need examples for music, radio, webinars, voice notes, edited copies, and folder structures, use the audio file naming guide.
Metadata Cleanup Tools
Use the right tool for the size of the job.
- Use the Cinch Library when the recording came from Cinch and you need song identification, cover art, lyrics, filenames, or export choices.
- Use the Audio Metadata Viewer when you want to inspect a file quickly.
- Use the Audio Metadata Editor for small browser-based edits.
- Use the free metadata repair workflow when you need to inspect first and change only fields you can verify.
- Use Clean Up Recorded Audio when the file also needs format, split, merge, or archive decisions.
For large libraries, do not edit blindly in bulk. Sort by obvious groups first: complete matches, partial matches, no matches, and files that need re-recording.
Related Solution Guides
- Clean up recorded audio
- Audio file naming guide
- Add cover art to audio files
- Record Spotify audio into cleaner files
- Record streaming audio without quality loss
- Fix first recording problems
- Download Cinch Audio Recorder
Frequently Asked Questions
Can a recorder add song metadata automatically?
Some recorders can identify music and fill in fields such as title, artist, album, cover art, or lyrics when a reliable match is available. Always review the result.
Why is my recorded song missing cover art?
Cover art depends on a successful match or manual artwork. Live versions, remixes, obscure tracks, and noisy recordings may need manual editing.
What metadata should I check after recording?
Check title, artist, album, cover art, lyrics, filename, format, and whether the file actually plays correctly from start to finish.
Should I fix metadata before or after trimming?
Verify and trim the audio first, then finalize metadata. Otherwise you may spend time tagging a file that still needs to be cut or re-recorded.