
How to Record Streaming Audio Without Quality Loss
 By HenrikUpdated Jul 29, 202616 min read
Learn how to record clean streaming audio with loopback tools, virtual cables, or Cinch Audio Recorder while avoiding silence, noise, and bad exports.
Turning your computer volume up does not make a streaming-audio recording higher quality. In many workflows, it only makes monitoring louder and gives system sounds more chances to get baked into the file.
The cleaner way to record streaming audio is to choose the right capture path before you press record. If this is a one-time job, start with a free loopback recorder. If you need app routing or microphone mixing, use a virtual audio cable or mixer. If the free route turns into device picking, notification control, manual splitting, and metadata cleanup, use a dedicated recorder such as Cinch Audio Recorder.
Before we dive into the steps, let’s address the elephant in the room: copyright. Make sure you’re only capturing streams for personal archiving or content you legally have the right to record. Nobody wants a compliance headache over a playlist. Also, do not treat any recorder as a guaranteed workaround for protected playback. Some browser or app streams can produce silence or unreliable capture when protection or endpoint behavior gets in the way.
The Short Answer
Use this order:
- Try a free loopback workflow if you only need one quick recording and you do not mind manual export.
- Use a virtual audio cable or mixer if you need to route one app, mix a microphone, or send audio between programs.
- Use Cinch Audio Recorder when you want a simpler streaming-audio workflow with recording, track handling, naming, metadata, cover art, lyrics, and library cleanup in one place.
Look, it all comes down to what you value more: your money or your time. The free routes absolutely work, but they demand absolute silence from your system audio capture path and manual trimming and tagging afterward. Cinch is the “set-and-forget” option that gives you a chopped, tagged music library while you go make coffee.
Before You Start: Three Checks That Prevent Bad Recordings
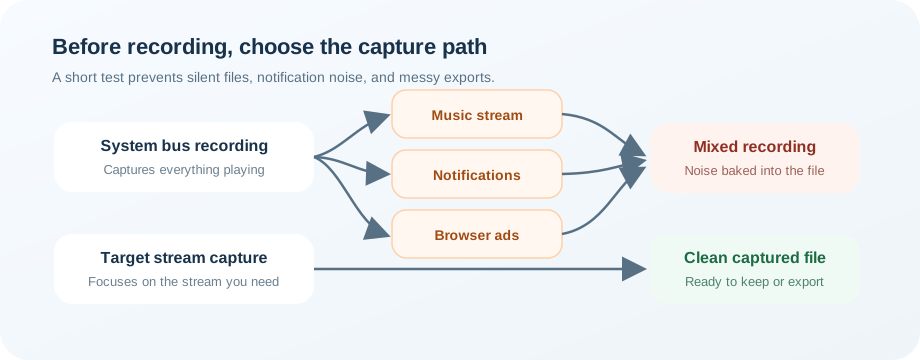
Before you record a full song, playlist, podcast, radio show, or webinar, do a 10-second test.
First, turn on Do Not Disturb or Focus Assist. Close chat apps, email apps, noisy browser tabs, and anything that can play a notification. Users report the same failure again and again: a long stream sounds perfect until one notification arrives near the end. Once that sound is mixed into the recording, removing it cleanly is much harder than preventing it.
Second, confirm the playback device. If Windows or macOS is playing through Bluetooth headphones, but your recorder is listening to speakers or a different virtual device, the file may be silent. This is especially common after switching headphones, docking a laptop, connecting HDMI, or changing a default output.
Third, decide what you need after the recording. If you only need a rough audio file, a free tool may be fine. If you need separated songs, useful filenames, track titles, cover art, lyrics, or a reusable music library, the post-recording work matters as much as capture.
What you should see after the test is straightforward: the file plays back, it contains the intended stream, it has no notification sounds, and it appears in the expected folder or recording library.
Method 1: Record Streaming Audio With a Free Loopback Workflow
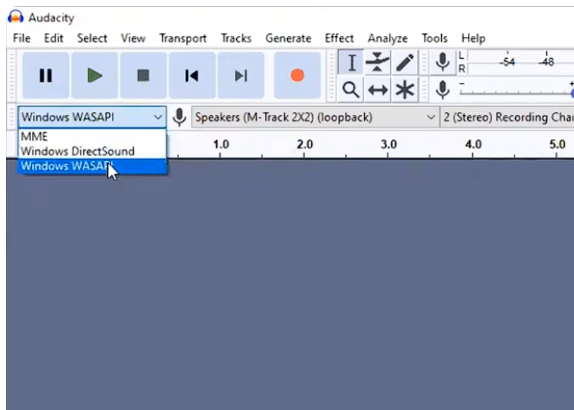
Free loopback recording is the right first attempt when your priority is cost. On Windows, this usually means using a recorder that can capture the audio being sent to the current playback device. On Mac, it may involve a compatible capture app or an audio-routing device, depending on the tool you choose.
A typical free workflow looks like this:
- Open your audio recorder.
- Choose the system playback or loopback source as the recording input.
- Start recording.
- Play the streaming audio in your browser, music app, podcast app, or radio page.
- Stop recording when the stream ends.
- Export the result to MP3, AAC, WAV, or FLAC.
- Play the exported file before deleting or closing anything.
This path is best for a one-off capture. It is not the best fit if you expect the tool to automatically identify songs, split a playlist, add cover art, fetch lyrics, or organize filenames.
In a WASAPI loopback test, a browser notification can land directly inside the recording because the capture follows the same audio output device. That is why the Do Not Disturb step matters before a long session.
If this fails, the likely cause is a device mismatch. Check whether the audio is playing through the same output your recorder is capturing. If you changed from speakers to Bluetooth headphones after opening the recorder, restart the test with the correct device selected. If the file is still silent, try another source app or browser tab to rule out protected playback behavior.
The downside is manual work. You may spend extra minutes choosing devices, exporting the file, trimming silence, naming the result, and adding metadata. For a single webinar or short clip, that may be acceptable. For a playlist or repeated music recording, it becomes a cleanup burden.
Method 2: Use a Virtual Audio Cable When You Need Routing
Virtual audio tools are useful when you need more than simple “record whatever is playing.” They can route one app into another, separate browser audio from other system sounds, or combine system audio with a microphone through a mixer.
The safe workflow is:
- Install the virtual audio device or mixer.
- Send the source app or system output to that virtual device.
- Set your recorder to capture from the same virtual device.
- Route monitoring back to your real speakers or headphones.
- Record a short test.
- Play the test file and confirm you can still hear the live source.
The monitoring step is where many people get stuck. The recording can be technically correct while your headphones go silent because the computer is now sending sound to the virtual cable instead of your real output. If that happens, restore the normal playback device or configure the virtual mixer to monitor through your headphones.
On modern macOS versions such as Ventura, Sonoma, and Sequoia, traditional virtual sound card tools can run into Apple’s tighter extension and security model. If you do not want to lower system security in Recovery Mode for older kernel-extension tools, use a modern tool such as BlackHole that does not rely on that old extension path, or use a recorder such as Cinch that supports newer macOS setups without a separate virtual sound-card configuration.
This is a better fit for advanced routing than for simple streaming-audio capture. It is also a different workflow from a dedicated music recorder. You get more control, but you also accept more setup time, more device names, and more ways for the route to break.
Method 3: Use Cinch Audio Recorder When Free Methods Get Noisy or Too Manual
If your first free attempt produces silence, captures notifications, or leaves you with one giant unnamed file, Cinch Audio Recorder is the practical shortcut to consider.
In our editor workflow, Cinch Audio Recorder bypasses the driver nightmare entirely. Instead of dragging you through system settings, it records local playback audio on Windows 10/11 64-bit and macOS 13.5+, captures up to 24-bit/48kHz audio, exports common formats such as MP3, AAC/M4A, FLAC, and WAV, and can keep WAV copies when you want a higher-quality archive or editing source.
Use it this way:
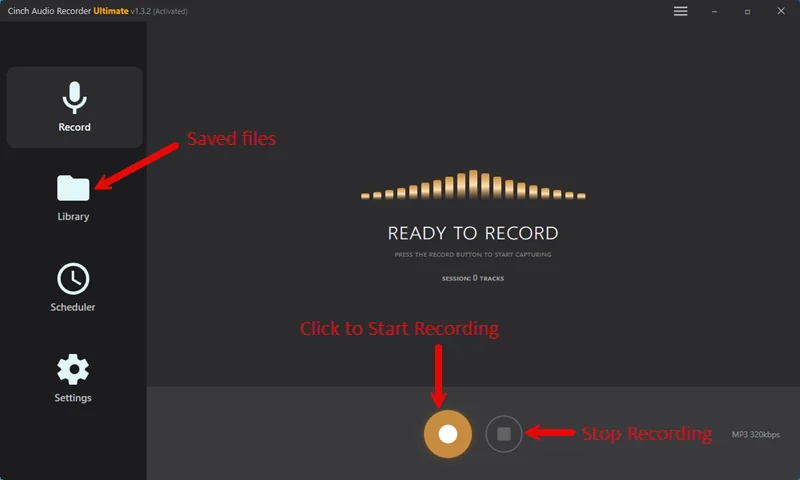
- Open Cinch Audio Recorder.
- Go to the Record tab.
- Click the yellow Recording button.
- Play the stream in your browser, music player, radio app, podcast page, or other source.
- Let Cinch detect playback and record.
- Open the Library tab when the recording is finished.
- Play the saved file and check the title, artist, cover art, lyrics, filename, and format.
That last step is why Cinch belongs in this guide, but not as the only answer. The main problem with streaming-audio recording is often not “can I capture sound?” It is “can I keep the file without spending the next hour cleaning it up?”
Cinch is strongest when the target is music, playlists, online radio, or repeated recording sessions. The supplied product material says it can auto-identify songs, fetch cover art and lyrics, apply filename patterns, filter short clips, merge fragments, schedule recording, import existing files, and manage a library. Those features solve the second half of the job: turning a recorded stream into files you can actually use.
Skip Cinch if you only need one free quick capture and you are comfortable cleaning up the result yourself. Use a DAW, OBS, or a virtual mixer instead if you need multitrack production, microphone mixing, or live broadcast routing.
Best Settings for Clean Streaming-Audio Recordings
Start with a short test, then check the settings that decide whether the final file is useful.
| Recording Scenario | Recommended Export Format | Recommended Sample Rate / Bit Depth | Core Reason |
|---|---|---|---|
| Everyday Spotify or web music playlists | MP3 / AAC (320kbps) | 44.1kHz / 16-bit | Small files that match typical lossy streaming sources well |
| Online radio or valuable podcast archiving | FLAC / WAV | 48kHz / 24-bit | Better for later editing and avoids another lossy compression step |
Recording Device
Use Auto if you are not sure, or choose the playback device that is actually producing the stream. If the recording is silent, this is the first setting to revisit.
Quality
Use MP3 or AAC for convenience. Use WAV or FLAC when you plan to edit, archive, or avoid another lossy encode. If the recorder offers 24-bit/48kHz, remember that the final result still depends on the source stream and playback path.
Output Folder
Choose a location you can find later. This sounds minor until you record a long stream and cannot locate the file.
Filename Pattern
For music, use a pattern such as %Artist% - %Title% or %Artist%\%Album%\%Title% when metadata is available. Good naming prevents a folder of files called track01.mp3, track02.mp3, and track03.mp3.
Auto-Identify and SMTC
For music, keep automatic identification enabled. If your player or browser exposes media information through system media controls, SMTC-style metadata can help with cleaner track information.
Min Song Duration and Short-Clip Filtering
Use these controls to reduce tiny clips, ads, and accidental fragments. For music recording, 45 or 60 seconds can be a useful starting point. Lower the value if you intentionally record short sounds.
Keep WAV
Use this when you want a lossless working copy before making smaller MP3 or AAC files.
Why 320kbps MP3 Does Not Magically Improve Quality
One of the most common streaming-audio myths is that exporting to 320kbps MP3 automatically makes a recording high quality. It does not.
If the original stream was already compressed at a lower bitrate, exporting the recorded signal to a larger MP3 does not restore detail that was already removed. It can create a bigger file while adding another lossy encoding step. The same logic applies to fake “hi-res” output. Saving a low-bitrate stream as 24-bit/96kHz FLAC may make the file much larger, but it does not turn the source into true hi-res audio.
The practical rule is match the source. Spotify Free, for example, is commonly delivered as a lossy Ogg stream around 160kbps, while Apple Music may use AAC or Lossless depending on the plan and settings. If the source is AAC, exporting to AAC can reduce unnecessary bitrate degradation compared with recording, decoding, and then re-encoding into an unrelated format.
The better rule is to match the format to the job:
- Use WAV or FLAC if you want an editing or archive copy.
- Use MP3 or AAC if you want small, convenient files for everyday listening.
- Avoid boosting gain so high that the recording clips or distorts.
- Turn off unnecessary audio enhancements if they make the recording sound processed, boomy, or uneven.
If you only keep one quality rule, keep this one: capture the stream cleanly first, then choose the output format for storage and playback. Do not use a bigger export number as a substitute for a cleaner source.
How to Avoid Notification Sounds, Silence, and Device Switching Failures
Internal audio recording is unforgiving because it captures what reaches the selected audio path. A notification, autoplay ad, or device switch can become part of the file.
Before long recordings:
- Turn on Do Not Disturb.
- Close chat, email, meeting, and social apps.
- Close browser tabs that can autoplay sound.
- Keep the same speakers, headphones, or Bluetooth device connected for the whole session.
- Do not switch default outputs mid-recording.
- Record and review a 10-second test.
If the recording is silent, do not immediately reinstall drivers. Check the simple things first: wrong playback device, wrong loopback input, Bluetooth switching, virtual-cable monitoring, muted source, or protected playback.
If the recording includes a notification sound, redo it after controlling the environment. Audio repair tools can sometimes reduce a small sound, but they usually damage nearby music or speech. Prevention is the clean fix.
If alerts are the repeat problem, follow the notification-sound recording checklist before the next take. It separates preventable system sounds from editing cases where re-recording is cleaner.
If the recording stops or splits unexpectedly, check silence detection, minimum duration, player gaps, network buffering, and output-device changes. For Cinch, review Min Song Duration, Discard Short, merge behavior, and the Library result before starting a full playlist again.
If a Browser Stream Records as Silence
If a specific browser stream records as complete silence, the cause may be hardware acceleration or Widevine DRM protection inside a Chromium-based browser. The first fix is to temporarily turn off Use hardware acceleration when available in the browser settings, restart the browser, and test again. If that still fails, try playing the same allowed source in Firefox and run another short recording test.
What to Do After Recording
Do not stop at “there is a file.” A useful recording still needs verification.
Check these items:
- Does the file play from start to finish?
- Is the source you intended actually recorded?
- Is there any notification, ad, or unrelated app sound?
- Is the format right for your use case?
- Is the filename useful?
- For music, are the title, artist, album, cover art, and lyrics correct?
- Did the recorder create tiny fragments that should be deleted or merged?
This is where a dedicated recorder can save real time. A playlist captured as one huge file may technically be successful, but it is not a finished library result. If you have to cut songs manually by looking at a waveform, search each title, add each artist, and rename every file, the free workflow is no longer free in practice. It is paid for with cleanup time.
If metadata is wrong, try re-identification or manual editing. Obscure tracks, live versions, remixes, and mashups may not match automatically. If the file itself is clean, a metadata miss is usually fixable.
Related Solution Guides
- Record browser audio without capturing the wrong sound
- Record Spotify audio without one messy file
- Record YouTube audio without background noise
- Record online radio and long streams
- Stop notification sounds in recordings
- Record internal audio without Stereo Mix
- Fix first recording problems
- Download Cinch Audio Recorder
Troubleshooting Checklist
The recording is silent.
Check the playback device first. Make sure the stream is playing through the same device your recorder is capturing. If you use a virtual cable, confirm both capture and monitoring routes. If the source is protected playback, try a different allowed source or accept that the stream may not be recordable with this workflow.
The recording captured notification sounds.
Turn on Do Not Disturb, close noisy apps, and record again. This is usually a prevention problem, not an editing problem.
The sound changed when you adjusted volume.
Some workflows are tied to the playback path. Avoid changing output devices or muting the wrong endpoint during capture. Run a short test after any volume or device change.
You cannot hear anything after setting up a virtual cable.
Your system may be sending audio into the virtual device without routing it back to your headphones. Restore your normal playback device or configure monitoring in the mixer.
The file is one long recording instead of separate tracks.
Use splitting, silence detection, or a music-focused recorder workflow. In Cinch, check Library tools, short-clip filtering, merge options, and metadata identification.
The title or artist is missing.
Try re-identification or manual editing. The recording may still be good even if the fingerprint or metadata match failed.
The exported file is huge but does not sound better.
You may have saved a compressed source into an oversized format. Use WAV/FLAC for editing or archiving, but do not expect a high-resolution container to recreate lost stream detail.
Frequently Asked Questions
Is it illegal to record streaming audio for personal use?
It depends on your location, the source, and the service terms. Keep the safe rule simple: only record streams for personal archiving or content you legally have the right to capture.
How do I record internal audio on Mac without Soundflower?
Use a modern virtual audio tool such as BlackHole, or use a recorder such as Cinch Audio Recorder that supports newer macOS setups without sending you through old Soundflower-style configuration.
Why does my recorded streaming audio sound muffled?
Muffled audio usually comes from bitrate degradation, low-volume capture, audio enhancements, or unnecessary re-encoding. Match the source format when possible, avoid clipping, and turn off sound effects that change the playback signal.
What is the easiest way to record streaming audio?
For a one-time free recording, try a loopback workflow first. For repeated music, playlists, online radio, or browser audio where naming and cleanup matter, Cinch Audio Recorder is usually the easier route because it combines recording with identification, library management, cover art, lyrics, filename patterns, and format choices.
Can I record streaming audio for free?
Yes, a free loopback recorder can work if your system exposes the right playback source and you are comfortable with manual export and cleanup. The cost is time: device selection, test recordings, trimming, naming, and metadata work are usually manual.
Why is my streaming-audio recording silent?
The most common cause is that the recorder is listening to the wrong device. Check whether your stream is playing through speakers, wired headphones, Bluetooth headphones, HDMI, or a virtual cable. Protected playback can also create silence or unreliable capture, so do not assume every stream is recordable.
Should I record streaming audio as MP3, WAV, FLAC, or AAC?
Use MP3 or AAC for small everyday listening files. Use WAV or FLAC when you want an editing or archive copy. Do not assume 320kbps MP3 or hi-res FLAC makes the audio better than the original stream.
How do I record a playlist without one giant file?
Use a workflow that can identify, split, name, or organize tracks after recording. With manual tools, you may need to cut the file yourself. With Cinch, use the Library, auto-identification, filename patterns, short-clip cleanup, merge controls, and manual edit or re-identify when a track does not match.
What to Do First
If this is a one-time capture and free matters most, start with a loopback recorder and run a 10-second test. If you need app routing or microphone mixing, use a virtual audio cable or mixer and test monitoring before the real session.
If your real goal is to keep streaming music or radio as organized local audio, move to Cinch Audio Recorder once the free path becomes too manual. Open the Record tab, click Recording, play the stream, then verify the saved item in Library. Check playback, filename, metadata, cover art, lyrics, and format before recording the next long session.
That gives you the practical win: not just a waveform, but a file you can actually keep.