
How to Record Internal Audio Without Stereo Mix
 By HenrikUpdated Jul 28, 202617 min read
Missing Stereo Mix on Windows 10 or 11? Learn three practical ways to record internal audio with Cinch, Audacity WASAPI, and virtual cable options.
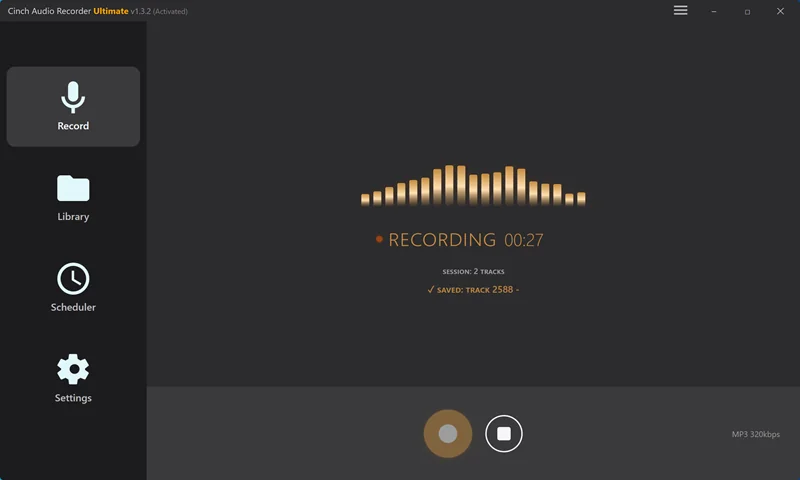
If Stereo Mix is missing on your Windows PC, you are probably past the polite stage already. You opened the old Sound panel, right-clicked the blank Recording tab, enabled Show Disabled Devices, and still found nothing. That usually is not your fault, and reinstalling Realtek drivers for the third time is rarely the fastest way out.
The practical answer is to record the sound that Windows is already playing, using either a simple internal-audio recorder, a free WASAPI loopback setup, or a virtual audio routing tool.
For most people who just want a clean audio file, start with Cinch Audio Recorder. It avoids the usual Stereo Mix hunt, records system playback, and gives you music-friendly extras such as automatic song identification, cover art, lyrics, file naming, and library cleanup. If you need a free route, use Audacity with Windows WASAPI. If you need advanced routing, use Voicemeeter or VB-Cable, but test it before you record anything important.
A quick reminder before we get practical: this guide is strictly for troubleshooting your Windows audio workflow. Please respect copyright and platform rules when capturing streams.
Before You Start
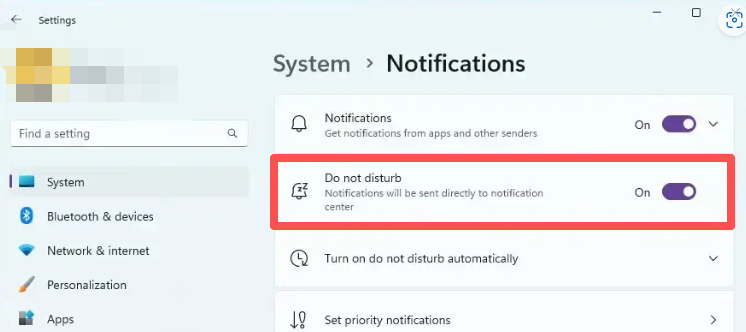
Before you start, make sure the audio source actually plays through the speakers or headphones you plan to capture. Close noisy apps, turn on Do Not Disturb, and record a 10-second test before a long session. That small setup check is the easiest way to catch the wrong device, a notification sound, or a silent recording before it costs you an hour.
Why Stereo Mix Is Missing
Stereo Mix used to be the easy answer because it exposed “what you hear” as a recording input. On many newer Windows laptops and desktops, it simply is not available. You can right-click the Recording tab, enable Show Disabled Devices, restart, update drivers, and still never see it.
That does not always mean you did something wrong. Some PCs do not expose Stereo Mix through their audio driver or hardware configuration, so the block can feel like it lives below the normal Windows settings layer. The exact reason can vary by manufacturer, driver package, and device design, so the safest practical rule is this:
If Stereo Mix is not visible after you show disabled recording devices, do not make driver hunting your main plan. Use a modern capture method instead.
The newer approaches work differently:
- Cinch Audio Recorder is the low-friction path: it records system playback and helps turn the result into organized audio files.
- Audacity + Windows WASAPI is the free path: it records a loopback from the selected playback device.
- Voicemeeter or VB-Cable is the routing path: it creates virtual audio devices so you can wire sound between apps.
The right choice depends less on “which one can record” and more on how much setup pain you are willing to accept.
The Short Answer
Use this order:
- Use Cinch Audio Recorder if you want the fastest route to a saved audio file, especially for music, playlists, online radio, or browser audio.
- Use Audacity with WASAPI if you want a free method and do not mind choosing devices and exporting manually.
- Use Voicemeeter or VB-Cable if you need custom routing, monitoring control, or app-to-app audio paths.
The trade-off is straightforward. Cinch saves time and cleanup work, but it is not the fully free route. Audacity is free, but it asks you to manage the capture setup and output yourself. Virtual routing tools are powerful, but they can make your system audio feel broken if you route monitoring incorrectly.
Method 1: Record Internal Audio with Cinch Audio Recorder
Let’s be honest: you did not search this because you wanted a masterclass in Windows audio routing. You searched it because you want to grab a song, podcast, radio stream, or webinar audio right now. If that is you, Cinch Audio Recorder is the fastest exit ramp.
Cinch Audio Recorder records the audio playing on your computer and then puts the result into a library where you can review, play, identify, rename, and manage the tracks.
Use it this way:
- Open Cinch Audio Recorder.
- Go to the Record tab.
- Click the yellow Recording button.
- Play the audio you want to capture in your browser, music player, radio app, or other source.
- Let Cinch detect the playback and record it.
- Open the Library tab when the recording is finished.
- Play the saved file and check the title, artist, cover art, lyrics, or filename if the recording is music.
That is the main reason Cinch belongs first in this article. The hard part of this task is usually not “can Windows audio be captured at all?” The hard part is getting a usable file without fighting drivers, virtual cables, export settings, and a pile of unnamed recordings.
The real nightmare is not always recording the audio; it is ending up with a folder full of files named track01.wav. Cinch handles much of the post-recording dirty work for you: it can identify songs, add cover art, fetch lyrics, set filename patterns, filter short clips, merge fragments, keep WAV copies, and export common formats such as MP3, AAC/M4A, FLAC, and WAV. That matters because most Stereo Mix tutorials stop the moment a file exists. A file named something like track01.mp3 is technically a recording, but it is not a finished music-library result.
Best Cinch Settings to Check First
You can start recording with the basic workflow, but a few settings are worth checking before a long session.
Recording Device
Use Auto if you are not sure, or choose the playback device you are actually using. If the saved file is silent, this is the first setting to revisit.
Quality
Choose the format and quality level that matches the job. For general listening, MP3 or AAC is convenient. For editing or archiving, FLAC or WAV is safer. The product material says Cinch can record up to 24-bit/48kHz, but the real result still depends on the source audio and playback path.
Output Folder
Set a folder you can find later. This sounds obvious until you record a long stream and cannot locate the file.
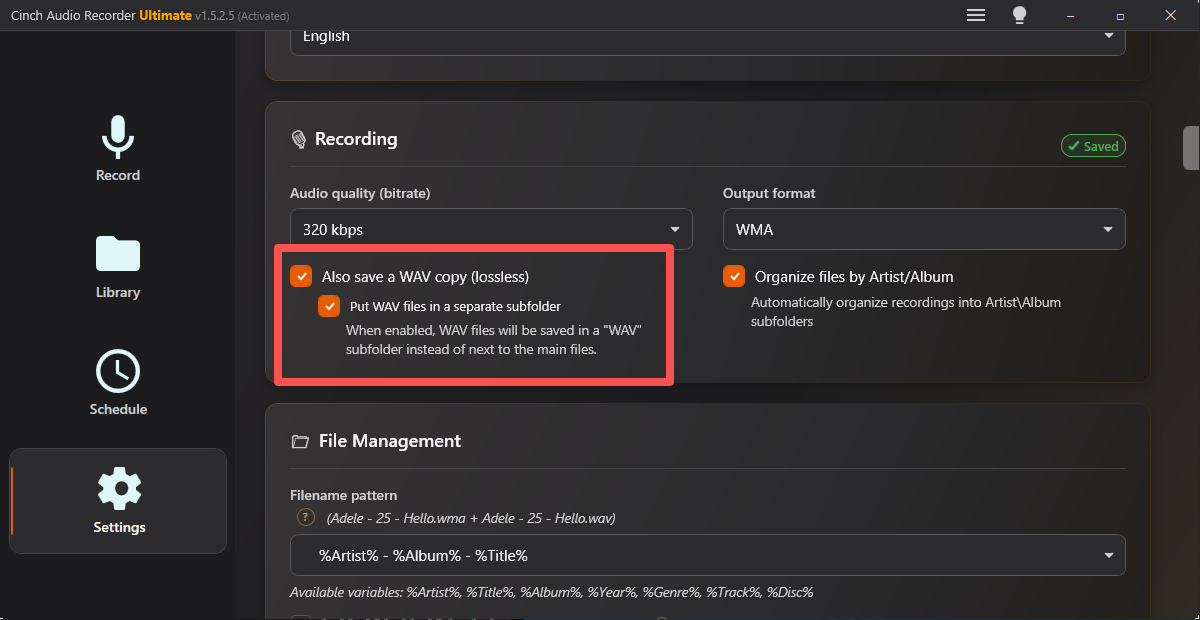
Filename Pattern
For music, use a pattern such as %Artist% - %Title% or %Artist%\%Album%\%Title% if the track is identified. This turns the recording process into a usable library workflow instead of a cleanup project.
Auto-Identify
Keep this on when recording music. It helps Cinch fill in song information after recording.
Enable SMTC
If you are recording from a player or browser that exposes media information through Windows media controls, this can improve track recognition behavior.
Min Song Duration and Discard Short
Use these to reduce tiny unwanted clips, short ads, or notification-like fragments. For music recording, a threshold such as 45 or 60 seconds can help avoid clutter. Lower it if you are intentionally recording short clips.
Keep WAV
Turn this on when you want a lossless copy for editing or backup.
The success check is simple: after recording, the file should appear in the Library, play back correctly, and show useful metadata where identification succeeded.
If this fails, the first fix is to check whether Windows is playing through a different output device than the one Cinch is listening to. Switch the Recording Device setting, play the source again, and make another short test before restarting the full recording.
What Happens If Something Goes Wrong Mid-Recording?
This is where internal-audio tutorials usually get too neat. Real recordings are messy: headphones disconnect, songs have silent gaps, Windows plays a notification sound, or you lower the volume because the source is too loud.
Here is the practical risk map:
| What Happens | Cinch Audio Recorder | Audacity + WASAPI | Virtual Cable / Voicemeeter |
|---|---|---|---|
| You get a Slack, Teams, or Windows notification | The sound can still be captured if it reaches system playback, so use Do Not Disturb first | Same risk; loopback captures the selected playback stream | Depends on routing, but notification audio may still enter the virtual path |
| You mute the wrong output | Less setup-sensitive, but still test before a long session | Can produce silence or an inconsistent capture depending on the playback path | Depends entirely on routing and monitoring choices |
| Bluetooth headphones switch or disconnect | Recheck the recording device and make a short test | The selected loopback endpoint may no longer match | Routing can break or monitoring can disappear |
| There is a silent gap between songs | Cinch is built around recording and library handling, then cleaning short fragments where needed | Some users report loopback/device interruptions or “Error opening sound device” style failures when the stream/device state changes | Usually survives if the route stays stable, but setup is heavier |
| You need only an audio file, not video | Direct audio workflow | Direct audio workflow after export | Direct audio workflow if configured correctly |
That last row is important. Screen recorders such as OBS can capture audio, but they are clumsy if your final deliverable is just an audio file. You often end up with MP4/MKV output, extra video overhead, and a second extraction step. For this keyword, a pure audio recorder is usually the cleaner answer.
Method 2: Record for Free with Audacity and Windows WASAPI
Audacity is the better first stop if your requirement is “free” rather than “least setup.” It can record internal playback through Windows WASAPI loopback when configured correctly.
The general workflow is:
- Open Audacity.
- Set the audio host to Windows WASAPI.
- Choose your active speaker or headphone loopback device as the recording input.
- Start recording.
- Play the audio source.
- Stop recording when finished.
- Export the result as an audio file.
This route works best when you are comfortable checking device names. If your headphones are the active playback device, choose the matching loopback input. If you switch from speakers to Bluetooth headphones halfway through, the selected endpoint may no longer match what you expect.
The main sacrifice is cleanup and reliability. You will usually need to export manually, name the file yourself, and handle metadata separately. You also need to be careful with system sounds. WASAPI loopback captures what is being sent to the selected output path, so a notification sound can end up in the recording if it plays during the session.
If your Audacity recording is silent, check these first:
- Is the audio actually playing through the device you selected?
- Did you choose the loopback version of the playback device?
- Did you switch headphones, speakers, or Bluetooth devices after starting?
- Did you mute or change output behavior in a way that affects the captured stream?
Audacity is a good tool. It is just not the same kind of tool as a dedicated music recorder. If you only need one quick free capture, it may be enough. If you want repeated recordings with recognition, naming, and library cleanup, Cinch is the smoother path.
Method 3: Use Voicemeeter or VB-Cable for Advanced Routing
Virtual audio tools are the most flexible option, but they are also the easiest way to confuse yourself.
The idea is simple: install a virtual audio device, send your app’s audio into that device, then record from it. In practice, you must also decide how you will monitor the sound through your real speakers or headphones. That monitoring step is where many users get stuck.
A safe workflow looks like this:
- Install the virtual routing tool.
- Set the source app or Windows output to the virtual device.
- Set your recorder to capture from that same virtual device.
- Route monitoring back to your real headphones or speakers.
- Record a 10-second test.
- Play the test file before recording the real session.
This is the right method if you need to separate apps, mix microphone plus system audio, or send audio between programs. It is the wrong method if you only want to record a song or a browser stream without touching driver-style settings.
The classic failure scene is painful: the recording works, but your headphones go silent because Windows is now sending audio to the virtual cable instead of your real output. If that happens, restore your normal playback device or configure monitoring inside the routing app.
Users report this kind of routing confusion often enough that it should not be treated as a rare edge case. If a forum or Reddit thread tells you to install a virtual cable, assume you also need a monitoring plan, not just a recording input.
Cinch vs Audacity vs Virtual Cable
| Feature | Cinch Audio Recorder | Audacity + WASAPI | Virtual Cable / Voicemeeter |
|---|---|---|---|
| Zero Setup | ✅ 5/5⭐⭐⭐⭐⭐Open, record, and play the source audio. | ⚠️ 3/5⭐⭐⭐You still need to choose the correct loopback device. | ❌ 1/5⭐Requires routing, monitoring, and device checks. |
| Metadata Auto-Tagging | ✅ 5/5⭐⭐⭐⭐⭐Built for song names, artists, artwork, lyrics, and filenames. | ❌ 1/5⭐Manual naming and tagging after export. | ❌ 1/5⭐Routing only; metadata cleanup is still separate work. |
| Best Fit | ✅ Music LibraryBest when you want recordings that are already organized. | ⚠️ Free CaptureGood for one-off recordings if setup time is acceptable. | ⚠️ Advanced RoutingUseful when you need custom app-to-app audio paths. |
| Main Trade-Off | Paid ToolSaves cleanup time, but is not the fully free route. | Manual CleanupExport, naming, and metadata are on you. | Setup RiskEasy to break monitoring or capture the wrong route. |
If your goal is only “record the sound coming from my PC,” Cinch or Audacity is usually enough. If your goal is “route audio between multiple apps,” use a virtual routing tool.
Practical Recording Tips
How to Avoid Notification Sounds in the Recording
Internal audio recording is honest in an annoying way: if Windows plays a ding, the recorder may capture the ding.
Before recording something important:
- Turn on Do Not Disturb or Focus Assist.
- Close chat apps, email apps, and browser tabs that can make sound.
- Disable web notification sounds for the session.
- Do a short test recording and listen to it.
- Only then record the real source.
This is especially important for music. A single Slack, Teams, Discord, or Windows notification can become part of the saved file. You usually cannot remove it cleanly afterward without damaging the audio around it.
Related Solution Guides
- Record streaming audio without quality loss
- Record browser audio cleanly
- Record Spotify audio without one messy file
- Record YouTube audio without background noise
- Fix first recording problems
- Download Cinch Audio Recorder
The Volume and Mute Trap
One detail many tutorials skip: some loopback workflows are tied to the playback path you are capturing. If you mute the wrong thing or change output devices mid-recording, the saved file can become silent or inconsistent.
Use this safer pattern:
- Start the recorder before the important part begins.
- Avoid switching speakers, headphones, or Bluetooth devices during recording.
- Do not mute system output unless you know your recorder can still capture independently.
- If the audio is too loud, lower the player volume carefully and test the result first.
With Cinch, the goal is to avoid having to think about virtual routing during normal recording. With Audacity or virtual cables, you need to treat the output device as part of the recording setup.
What to Do After Recording
Do not stop at “I have a file.” The file still needs to be usable.
For music recordings, check:
- Does the file play from start to finish?
- Is the title correct?
- Is the artist correct?
- Is the album or cover art present if you care about library display?
- Is the filename useful?
- Did short ads, fragments, or notification clips get saved as separate files?
This is where Cinch has a clear workflow advantage. Its product material describes automatic song identification, cover art, lyrics, library management, short-clip cleanup, filename patterns, manual editing, re-identification, and batch metadata editing. Those features are not just extras. They solve the second half of the problem: turning a captured stream into files you can actually keep.
If identification fails, do not assume the recording failed. Some tracks are obscure, live, remixed, or not available in the matching database. Use manual edit or re-identify, then verify the saved metadata in your preferred player.
Troubleshooting Checklist
Stereo Mix is still missing.
If you already enabled hidden and disabled devices, move on. Use Cinch, Audacity WASAPI, or virtual routing instead of spending hours on drivers.
The recording is silent.
Check that the audio source is playing through the same device your recorder is capturing. If using Audacity, choose the correct loopback device. If using Cinch, check Recording Device. If using a virtual cable, verify both input and monitoring routes. The likely cause is usually a device mismatch, not a broken recorder.
The file captured system notification sounds.
Turn on Do Not Disturb, close noisy apps, and redo the recording. Prevention is easier than repair.
You cannot hear anything after installing a virtual cable.
Set your normal headphones or speakers back as the default playback device, or configure monitoring in the routing tool.
The recording stops or splits unexpectedly.
Check silence detection, minimum duration, source playback gaps, and output-device changes. For Cinch, review Min Song Duration, Discard Short, and merge options. For manual tools, record a short test with the same source before a long session.
The track has no name or wrong metadata.
Use re-identification or manual editing. For music, also check whether the source is a remix, live version, or obscure track that may not match automatically.
Frequently Asked Questions
Why did Stereo Mix disappear on my Windows 11 Dell, HP, or Lenovo laptop?
In many cases, it did not “disappear” because of a setting you missed. The audio driver or hardware configuration may simply not expose Stereo Mix as a recording device. DRM protection, OEM sound card limitations, and driver design can all be part of the broader reason, but the practical takeaway is simpler: if Show Disabled Devices does not reveal Stereo Mix, move to a modern internal-audio capture method instead of endlessly reinstalling drivers.
How do I record internal audio and microphone at the same time?
If you need system audio plus microphone, you are moving beyond simple “record what the computer is playing.” A virtual mixer such as Voicemeeter is usually the better fit because it can combine multiple inputs. The trade-off is setup time: you must route system audio, microphone input, and monitoring correctly before the real recording.
Why is my Audacity WASAPI recording totally silent?
The likely cause is a device mismatch. WASAPI loopback records the selected playback device, so if Windows is playing through Bluetooth headphones but Audacity is listening to speaker loopback, the result can be silence. Also check whether exclusive mode, a device switch, or an audio stream drop changed the endpoint during recording.
Can OBS record internal audio without Stereo Mix?
Yes, OBS can capture desktop audio, but it is usually not the cleanest workflow if you only want audio. You may get a video container first and then need to extract the audio afterward. Use OBS when video or screen capture matters; use a pure audio workflow when you only need an audio file.
Is Cinch Audio Recorder only for music?
No. The strongest fit is music and streaming audio because Cinch can help with track identification, cover art, lyrics, filenames, and library organization. But the same internal-audio recording idea can also apply to browser audio, online radio, webinars, and other playback you are allowed to capture.
Final Recommendation
If you want the least painful answer, use Cinch Audio Recorder first. It is the best fit when your real goal is not learning Windows audio internals, but getting a clean internal-audio recording and turning it into a usable file.
Use Audacity if free matters more than convenience. Use Voicemeeter or VB-Cable if routing control matters more than simplicity. Skip driver-chasing unless you have a specific reason to believe your PC should expose Stereo Mix.
Right now, do this:
The fastest reliable workflow is:
- Open Cinch.
- Click Recording in the Record tab.
- Play the audio.
- Check the saved item in Library.
- Verify playback, filename, and metadata.
- Adjust quality, filename, short-clip filtering, and identification settings before the next long session.
That gives you what Stereo Mix used to promise, without depending on Stereo Mix being available at all.
Continue With the Right Next Step
Once the capture works, spend a minute checking the file rather than assuming the job is finished. Our first-recording troubleshooting checklist covers silence, wrong-device capture, notification sounds, and unexpected splits. If the recording is usable but the title, cover, lyrics, or export format needs attention, follow the recorded-audio cleanup and metadata guide.
For a broader decision between a loopback workflow, virtual routing, and a dedicated recorder, see how to record streaming audio. You can also download Cinch Audio Recorder from the download center when you want to test its recording and Library workflow on your own computer.