
How to Choose Bitrate for Recorded Audio
 By HenrikUpdated Aug 7, 20266 min read
Pick a practical audio bitrate for voice, music, long recordings, editing copies, sharing, storage, and streaming-audio archives.
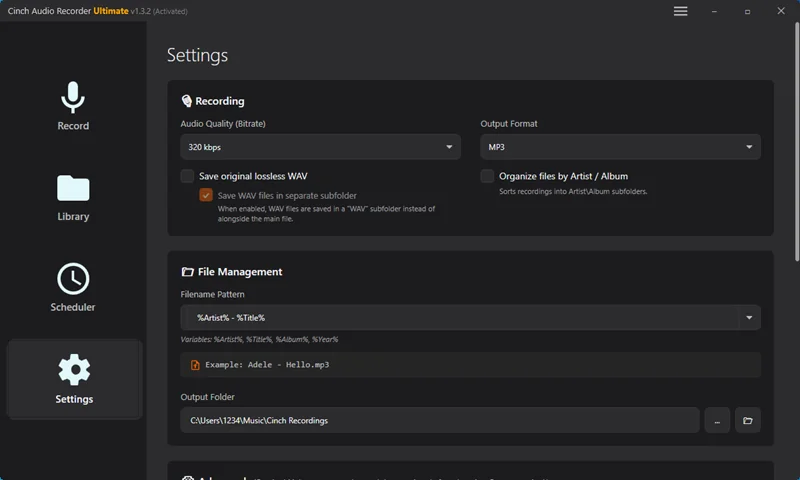
Bitrate is one of those settings that looks technical but usually comes down to a practical question: how good does the file need to be, and how large can it be?
For recorded audio, the best bitrate is not always the highest number. A spoken lecture, a long online radio show, a music playlist, and a support sample each deserve a different setting.
The Short Answer
Use this as a starting point:
| Recording Need | Bitrate to Try | Why |
|---|---|---|
| Voice notes, meetings, lectures | 64-96 kbps | Small files, clear enough for speech |
| Podcasts and spoken shows | 96-128 kbps | Better voice detail without large files |
| Everyday streaming audio | 128-160 kbps | Balanced listening copy |
| Music you care about | 192-256 kbps | More room for detail in the final file |
| Maximum MP3 listening copy | 320 kbps | Large compressed file; useful only when size is acceptable |
| Editing or archive copy | WAV or FLAC instead of bitrate-only MP3 thinking | Avoids another lossy export before cleanup |
If you are unsure, make a short test at two settings and listen before recording a full session. A 30-second comparison is more useful than guessing from a table.
If the recording is already finished and only the file type is wrong, do not start by changing bitrate. Use the wrong audio format after recording guide to decide whether conversion is enough or whether the capture needs to be repeated.
Bitrate Is Not a Quality Upgrade Button
Higher bitrate helps most when the recording route and source are already clean. It cannot fix:
- A muted or wrong playback device.
- A noisy microphone capture when you meant to record system audio.
- A source that is already low quality.
- Clipping caused by audio that is too loud.
- A silent file caused by starting the recorder before playback begins.
Before fine-tuning bitrate, confirm the recording actually captures the right source. The test audio before a long session guide is the better first step if you are not sure the setup works.
Choose Bitrate by Use Case
Voice-heavy recordings
For meetings, lectures, webinars, notes, and spoken radio, start with 64-96 kbps. Speech usually does not need a high music-style bitrate, and smaller files are easier to keep, upload, and search later.
Use 96 or 128 kbps if the voice has music beds, room ambience, or multiple speakers you want to preserve more carefully.
Everyday music listening
For saved streaming audio you mainly want to listen to later, start at 128-160 kbps. This keeps storage reasonable while still producing a practical listening copy.
If you notice obvious artifacts on familiar music, test 192 or 256 kbps with the same source. Do not change ten settings at once; compare one bitrate change at a time.
Music you want to keep for a long time
For music that matters more, 192-256 kbps is a sensible compressed range. It gives the export more room without making every file as large as a lossless working copy.
Use 320 kbps only when you know the storage cost is acceptable. For a long playlist or radio archive, 320 kbps can become bulky quickly.
Editing, trimming, or cleanup
If you plan to trim, normalize, repair volume, or do several edits, bitrate may be the wrong first question.
Use a lossless working copy such as WAV or FLAC when the edit matters, then export a smaller MP3 or M4A listening copy afterward. The best audio format guide explains when that extra working copy is worth keeping.
Bitrate and Storage Planning
Compressed audio file size follows a simple pattern:
bitrate x duration / 8
That means a one-hour file at 128 kbps is much smaller than a one-hour file at 320 kbps. The difference feels small for a single test, but it matters for multi-hour radio, classes, interviews, or playlists.
Before a long session:
- Pick the format and bitrate.
- Estimate the file size.
- Leave room for retries, artwork, metadata, and exports.
- Record a short sample.
- Check the saved file before recording the full source.
Use the Audio File Size Calculator to estimate one file, or the Recording Time Calculator to see how many hours your storage can hold.
Bitrate Choices for Common Recording Plans
| Plan | Suggested Starting Point | Check Before Full Recording |
|---|---|---|
| One-hour webinar | MP3/M4A at 96-128 kbps | Voice clarity, silence, notification sounds |
| Long online radio show | MP3/M4A at 128-160 kbps | Storage, power, source playback stability |
| Music playlist | MP3/M4A at 160-256 kbps | Metadata, track split, familiar song sample |
| Short support sample | MP3 at 128 kbps or WAV if requested | Whether the problem is audible in the sample |
| File for editing | WAV or FLAC working copy | Export smaller copy only after cleanup |
| Archive of spoken content | MP3/M4A at 96-128 kbps | Filename, date, topic, folder path |
This table is a starting point, not a rulebook. The right setting is the one that survives your playback test and fits your storage plan.
A Practical Cinch Workflow
For repeated recording with Cinch Audio Recorder:
- Choose the format before the session starts.
- Start the source playback.
- Record a short sample.
- Play the saved result from the Library or output folder.
- Check whether the content, volume, and tags are usable.
- Record the full session only after the sample is clean.
- Rename, trim, normalize, or edit metadata after confirming the content is correct.
For a long radio, class, or playlist capture, read the best settings for long audio recording guide before leaving the computer unattended.
Common Mistakes
Choosing 320 kbps for every file
This creates larger files without always producing a meaningful listening difference. Use it selectively, especially if you record long sessions.
Using a low bitrate to hide a bad setup
Low bitrate can make a file smaller, but it does not solve clipping, silence, wrong-device capture, or noisy microphone recording.
Comparing two different sources
If you test 128 kbps on one song and 256 kbps on another, the comparison is not useful. Use the same source, same volume, and same recording route.
Forgetting the final device
A file that sounds fine on desktop speakers may be used later in a car, phone, USB drive, editor, or LMS upload. Choose a format and bitrate that fit where the file will actually go.
Related Guides and Tools
- Best audio format for recording
- Wrong audio format after recording
- Best settings for long audio recording
- Test audio before a long session
- Audio File Size Calculator
- Recording Time Calculator
- Clean up recorded audio
Frequently Asked Questions
What bitrate should I use for recorded audio?
Use 64-96 kbps for voice-heavy recordings, 128-160 kbps for general listening, and 192-256 kbps when music quality matters. Use 320 kbps only when the larger file is worth it.
Does a higher bitrate always sound better?
No. A higher bitrate can reduce compression loss during export, but it cannot improve a weak source, a noisy recording route, clipping, or a stream that was already low quality.
Is 128 kbps enough for recording music?
It can be enough for casual listening and long sessions. For music you care about, test 160, 192, or 256 kbps with the same source and compare the saved files before recording a full session.